


How to Transfer Data from a Broken MacBook to a New Mac (2026 Guide)
Updated: Jul 23
Data RecoveryWhat if that black screen isn't actually the end for your years of professional work and family photos? Staring at a MacBook that won't power on is incredibly stressful, especially when you have a deadline looming and a new machine waiting on your desk. You likely feel that your files are trapped forever behind a failed logic board or liquid damage. The good news is that a non-responsive computer is rarely a data dead end. You can still transfer data from broken macbook to new mac if you follow the correct recovery sequence.
We understand the urgency of getting back to work without losing your digital life. This guide provides a clear path to rescue your files safely and efficiently. You'll discover the exact steps to move your data, the critical differences between Intel and M-series hardware, and how to realize when it's time to call a Toronto specialist. We'll show you how to navigate these technical hurdles so you can move forward with professional confidence.
Table of Contents
Assessing the Damage: Is Your Data Actually Gone?
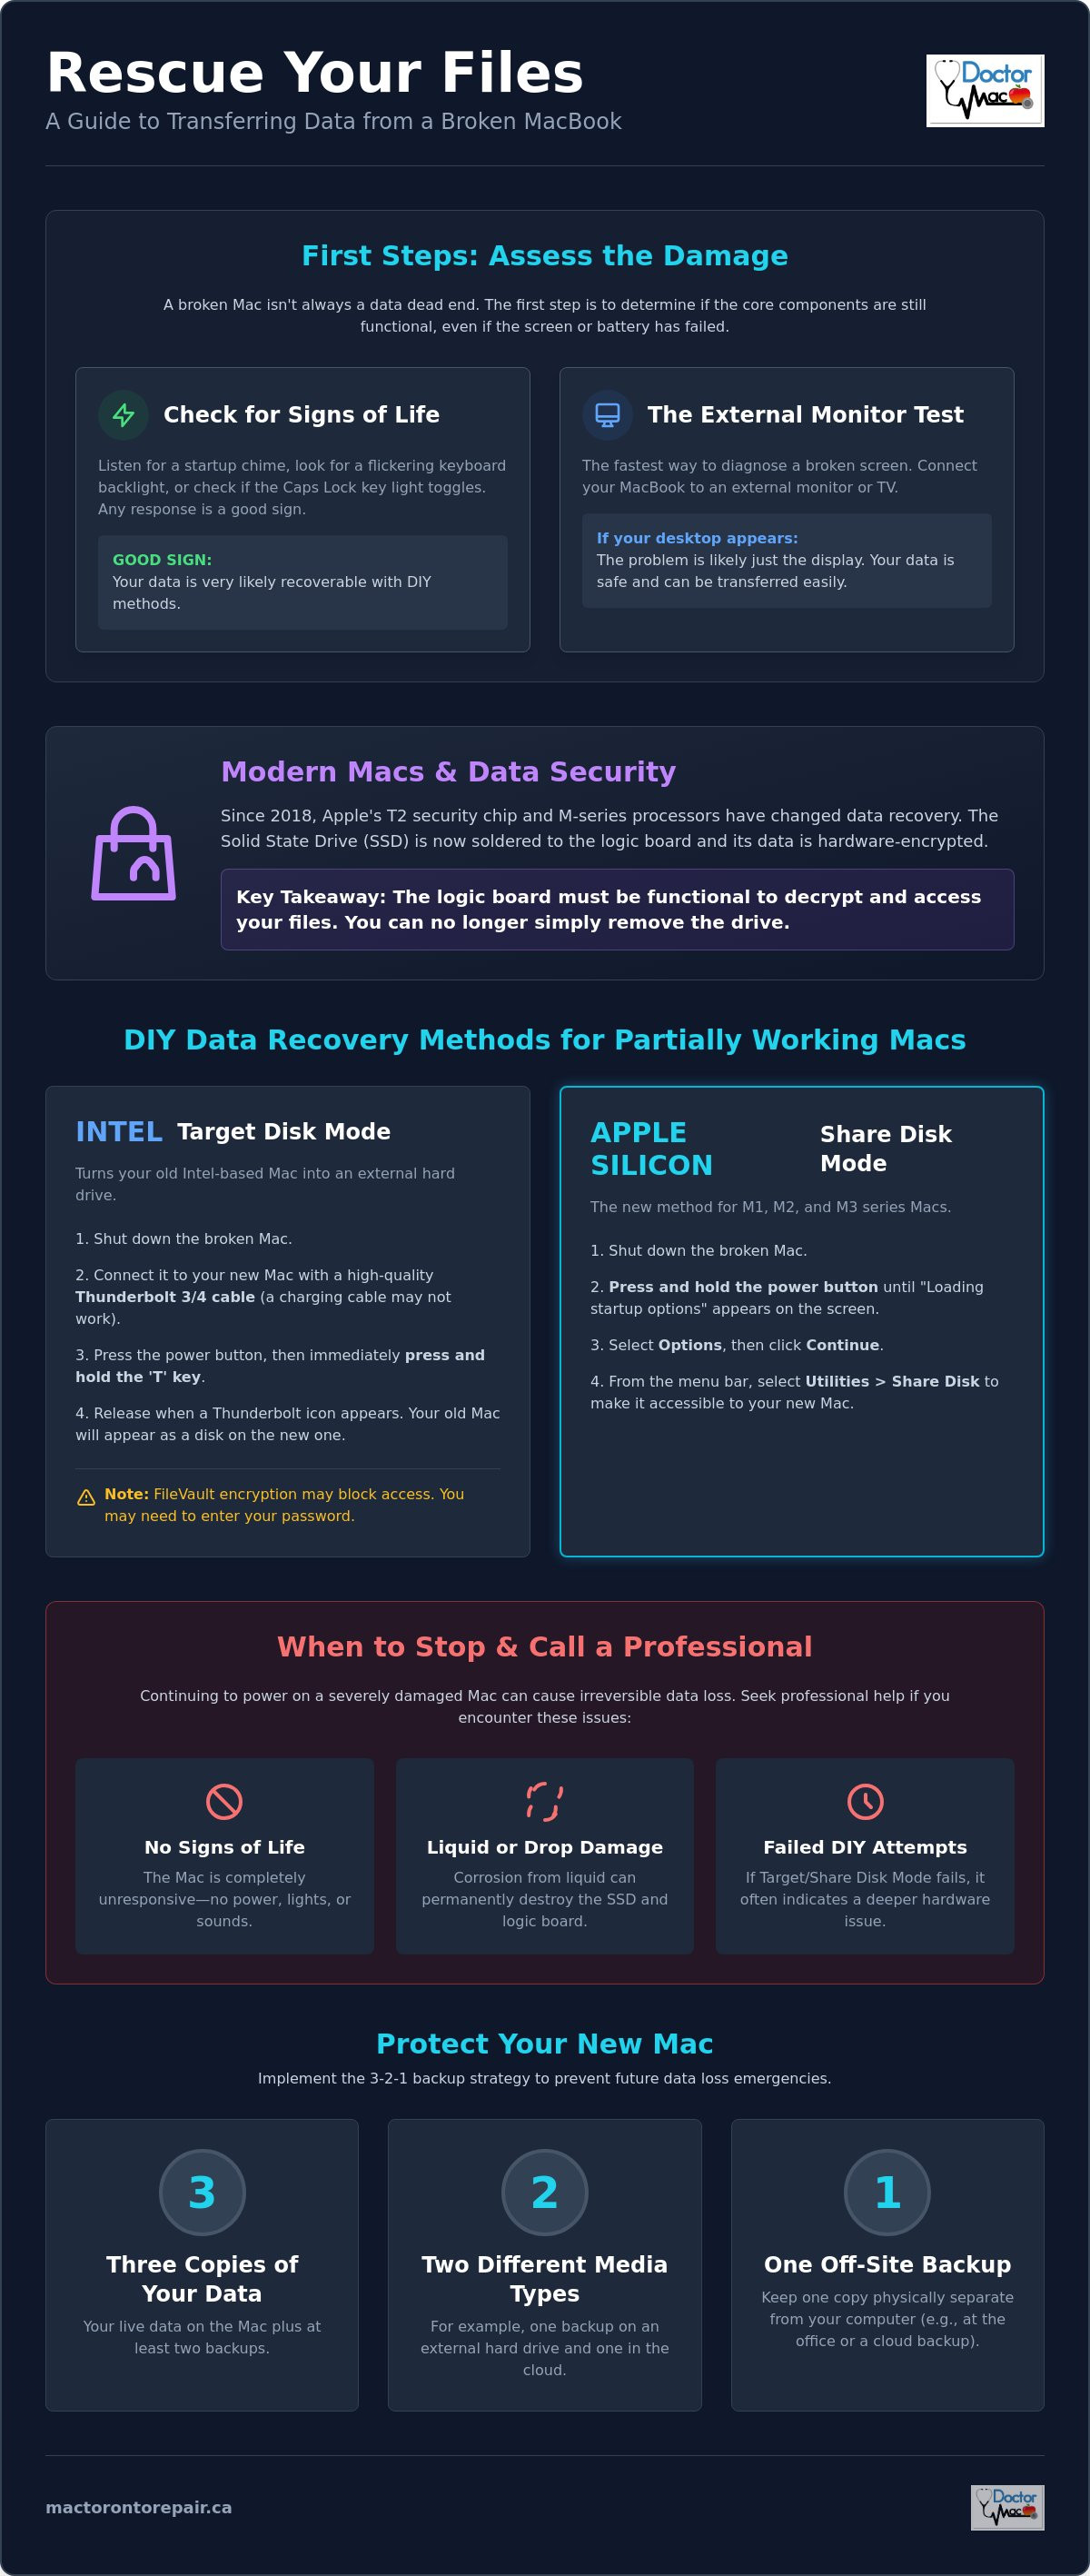
A broken Mac isn't always a total loss. Often, the damage is localized to a single component like the display or the battery while your files remain perfectly intact on the storage drive. If the computer still makes a startup chime or the keyboard backlight flickers, your data is likely sitting untouched. Identifying whether you have a power failure or a simple screen failure is the first step to a successful recovery.
The "External Monitor Test" is the fastest way to check for life. Connect your MacBook to a television or desktop monitor via HDMI or USB-C. If your desktop appears on the second screen, you can easily transfer data from broken macbook to new mac using standard tools like Migration Assistant. This simple test can save you hundreds of dollars in unnecessary repair fees.
To better understand how to move your files between machines, watch this helpful video:
Seeing a flashing folder with a question mark is terrifying. However, it does not always mean your files are deleted. It usually indicates that the Mac cannot find a valid operating system to boot from. This could be caused by a software glitch or a failing internal cable rather than a total hardware collapse. Understanding the role of the SSD (Solid State Drive) is vital here; in modern Macs, this drive is the permanent home for your data, and its health determines your recovery options.
The Difference Between Software and Hardware Failure
Physical damage from liquid spills or hard drops creates a much different data recovery process than a simple macOS crash. Software corruption can often be fixed with Disk Utility in Recovery Mode. If you've spilled coffee on your keyboard, you must stop trying to power it on immediately. Electricity moving through wet circuits causes corrosion that can permanently destroy the SSD. Check for life by pressing the Caps Lock key to see if the green light toggles or listening closely for fan noise. If the machine is silent and dark, the logic board likely requires professional attention.
The T2 and Apple Silicon Factor
Modern Mac architecture has changed the rules of file rescue. Since 2018, Apple has integrated security chips and moved to proprietary M-series processors that encrypt data at the hardware level. You can no longer simply pull out the storage drive and stick it into an external enclosure because the SSD is soldered directly to the logic board. The T2 security chip and Apple Silicon mean that the logic board must be functional for the data to be decrypted and accessible. This makes professional logic board repair a critical path for anyone needing to transfer data from broken macbook to new mac when the unit is completely dead.
Software-Based Migration for Partially Functional MacBooks
If your computer shows signs of life, you have a high chance of a successful DIY rescue. The most straightforward method is using the built-in Migration Assistant. This utility moves your user accounts, applications, and settings in one go. You can find detailed technical steps in the official Apple Migration Assistant guide. However, if your display is shattered or the trackpad is unresponsive, you'll need to use specific hardware modes to turn your broken Mac into an external drive.
For those with a working operating system but a dead screen, try the Screen Sharing trick. If you previously enabled "Screen Sharing" or "Remote Management" in your settings, you can log in from your new Mac to initiate the transfer. This bypasses the broken hardware entirely. If you didn't enable it, connecting an external monitor is your best bet. Don't forget your backups, either. If your old Mac is too unstable to stay powered on for a full migration, a recent Time Machine drive is a lifesaver. Simply plug that drive into your new machine during the initial setup to transfer data from broken macbook to new mac without needing the original hardware to function perfectly.
Steps for Using Target Disk Mode
This mode is specific to Intel-based Macs. You'll need a high-quality Thunderbolt 3 or Thunderbolt 4 cable; a standard USB-C charging cable often won't work for high-speed data. Shut down the broken Mac. Press the power button and immediately hold the "T" key until a Thunderbolt icon appears on the screen. Connect it to your new Mac. It should appear as a gold disk icon on your desktop. If it doesn't mount, check your Security Utility settings in Recovery Mode. FileVault often blocks the connection until you provide the admin password.
Using Share Disk on M1, M2, and M3 Macs
Apple Silicon has changed the process significantly. Instead of holding "T," you must shut down the Mac and hold the power button until "Loading startup options" appears. Select Options, then click Continue. Navigate to Utilities and choose Share Disk. Select your startup disk and click "Start Sharing." On your new Mac, go to the Network section in Finder to locate the shared drive. You'll still need your old password to unlock the encrypted volume. This method is highly efficient for those who want to transfer data from broken macbook to new mac without moving every single file. If your Mac remains unresponsive during these steps, it might be time for professional data recovery to bypass the underlying hardware failure.
Hardware-Level Recovery: When Your MacBook Won’t Power On
If your MacBook is completely unresponsive, software solutions are no longer an option. You cannot boot into Share Disk Mode if the power rails are dead. This is the point where most users panic, thinking their files are gone forever. On modern MacBooks, the challenge is that the SSD is soldered directly to the logic board. You cannot simply unscrew the storage and plug it into another machine. To successfully transfer data from broken macbook to new mac when the unit won't turn on, you must address the hardware failure itself.
Authorized technicians sometimes use a proprietary Apple Customer Data Migration Tool for specific older models that feature a dedicated life-boat connector on the logic board. However, this port is absent on the latest M-series machines. For these newer models, the only way to rescue files is to perform a temporary logic board repair. This involves identifying and bypassing short circuits that prevent the Mac from communicating with a new machine. It is a surgical process that requires specialized equipment and deep technical knowledge of power delivery circuits.
Recovering Data from Older MacBooks (Pre-2016)
If you own a MacBook Air from 2017 or earlier, or a MacBook Pro from 2015 or older, the recovery is much simpler. These models feature removable SSDs. You can physically extract the drive and use a SATA-to-USB or proprietary M.2-to-USB adapter to access your files. Always ground yourself before touching internal components to avoid static discharge. Once the drive is in an external enclosure, it will appear as a standard USB drive on your new Mac. This allows you to transfer data from broken macbook to new mac by simply dragging and dropping your folders in Finder.
Advanced Logic Board Data Rescues
For modern units with soldered storage, we focus on board-level intervention. Liquid damage often creates corrosion that bridges power lines and prevents the system from booting. We use ultrasonic cleaning to safely remove this debris without damaging delicate chips. If a specific component like a capacitor has failed, micro-soldering allows us to replace that single part to restore power to the SSD. At Doctor Mac Toronto, we prioritize logic board repair over total replacement. A replacement board is blank; a repaired board contains your life's work. This technical precision is why we can often rescue data even after catastrophic spills or power surges that would otherwise result in permanent loss.
Comparing DIY vs. Professional Data Migration Services
Deciding between a DIY rescue and professional help comes down to a simple risk assessment. A Thunderbolt cable is a small investment; however, your data is often priceless. The cost of a high-quality cable is negligible compared to the weeks of productivity lost if your drive becomes unreadable. If your MacBook suffered a liquid spill, every power-on attempt is a dangerous gamble. Electricity can bridge corroded connections and permanently fry the SSD controller. While DIY methods are satisfying when they work, professional diagnostics often take just one hour to identify the root cause. This speed is essential when you have work deadlines looming and need a clear roadmap to recovery.
When to Attempt DIY Recovery
You should only try a DIY transfer if you meet specific criteria. First, ensure the damage is limited to the screen or keyboard. Second, verify you have the correct high-speed Thunderbolt 3 or 4 cables and a second functional Mac. If you have a recent Time Machine backup, the pressure is significantly lower. You must recognize the "stop" point immediately. If the machine smells of ozone, makes clicking sounds, or becomes hot to the touch, shut it down. Forcing a transfer data from broken macbook to new mac on a physically failing machine can turn a recoverable issue into a permanent loss. SSD cells can only withstand a certain amount of stress when the power rails are unstable; repeated attempts can wear out the drive's remaining life.
The Advantages of Professional Toronto Mac Repair
Local specialists offer tools that aren't available to the general public. Our team utilizes advanced Macbook Logic Board repair techniques to stabilize "dead" units long enough for a full data dump. We use specialized hardware that communicates directly with the SSD, bypassing a crashed operating system entirely. Choosing a local Toronto shop also ensures your data privacy and security; your machine stays in a controlled environment rather than being shipped to a massive warehouse. If you are worried about AppleCare, realize that a failed DIY hardware repair will void your warranty immediately. Professional intervention provides a steady hand and a 90-day warranty on the hardware work performed. This approach balances speed with technical precision to ensure your files move safely. To get your files back without the guesswork, contact our Toronto data recovery team for immediate assistance.
Protecting Your Files: Future-Proofing Your New Mac Setup
Once you successfully transfer data from broken macbook to new mac, your focus must shift to ensuring this stress never happens again. Hardware fails; it is a matter of when, not if. Adopting the 3-2-1 backup rule is the industry standard for professional reliability. This means keeping three copies of your data: two on different physical media and one stored offsite. By distributing your files across multiple locations, you eliminate single points of failure that lead to permanent loss.
Optimizing iCloud is a vital second layer for your new setup. Enable "Desktop & Documents" folders to sync with the cloud immediately. This ensures that even if your new MacBook suffers a sudden failure, your most recent work remains accessible from any web browser. However, remember that iCloud is a synchronization tool, not a true archival backup. Deleting a file on your Mac often deletes it in the cloud simultaneously. This is why a physical Time Machine drive remains non-negotiable for every Toronto professional working on tight deadlines.
Configuring Time Machine Correctly
Speed and reliability depend on your hardware choices. Choose a high-quality external SSD rather than an old-fashioned mechanical hard drive. SSDs handle the rapid data bursts of modern macOS much better and are less prone to physical failure if bumped. Once connected, automate your backups to run hourly. You should never have to think about data migration again. Every few months, perform a test restore. Pull a single file from a week ago to realize that your system is actually capturing your changes. A backup you haven't tested is just a hope, not a safety net.
How Doctor Mac Toronto Simplifies the Switch
When a hardware disaster strikes, you need a steady hand to navigate the recovery. Our specialized Data Recovery services are designed for catastrophic failures where DIY methods fall short. Whether it is liquid damage or a dead logic board, we prioritize your files. We understand that time is money for Toronto's workforce. Our 1-hour turnaround for common diagnostics keeps your projects on schedule and reduces the downtime associated with technical failures. We have seen every possible failure and remain unfazed by the most complex data rescues.
Before you recycle or repair your old machine, ensure your privacy is protected. If we have helped you transfer data from broken macbook to new mac, the final step is a secure wipe of the old storage. We can assist with this process to ensure your personal information never leaves the shop. Don't let a broken Mac stall your career or your peace of mind. Contact Doctor Mac Toronto today for a fast data migration quote.
Restore Your Productivity and Peace of Mind
You've discovered that a shattered screen or a silent logic board doesn't have to mean permanent data loss. Whether you use Share Disk mode for a quick DIY fix or require specialized board-level repair for a liquid-damaged unit, the path to recovery is strictly methodical. Moving your files safely requires the right cables and a calm approach to avoid further hardware stress. It's entirely possible to transfer data from broken macbook to new mac even when the original machine refuses to power on.
If you're facing a high-stress deadline and DIY methods aren't working, you need an authoritative expert to guide the process. With over 20 years of Mac repair expertise, our team provides Toronto's choice for 1-hour service on common diagnostics. We use premium parts and back our work with a 90-day warranty on all hardware repairs. You can trust our local specialists to handle your machine with the care and transparency it deserves. Don't let a technical failure stall your career for another day. Get Your Files Back Today: Visit Doctor Mac Toronto for a fast and reliable data rescue. Your digital life is too important to leave to chance.
Frequently Asked Questions
Can I transfer data from a MacBook that won’t turn on?
Yes, you can. If the machine is completely dead, the storage chips must be powered up through a temporary logic board repair. Since modern Mac storage is soldered directly to the board, this hardware-level intervention is the only reliable way to transfer data from broken macbook to new mac when the unit won't respond to the power button. Specialists use micro-soldering to bypass short circuits and stabilize the drive for a one-time migration.
How much does it cost to recover data from a broken Mac in Toronto?
Costs vary significantly based on the nature of the failure. Software-level rescues are generally more affordable than hardware-level interventions. If your Mac requires specialized liquid damage treatment or micro-soldering to access the SSD, the technical labour involved will be higher than a simple file transfer. A professional diagnostic can usually identify the specific failure and provide a clear quote within one hour.
Will Migration Assistant work if my MacBook screen is completely black?
Migration Assistant is fully functional even with a black screen if you use an external monitor. Connect your MacBook to a television or desktop display via HDMI or USB-C. Once you can see the interface on the second screen, you can proceed with the migration as if the internal display were perfect. This allows you to transfer data from broken macbook to new mac without needing a costly screen replacement first.
How do I use Target Disk Mode on a Mac with a broken keyboard?
You will need to connect an external USB keyboard to bypass the broken internal keys. For Intel units, hold the "T" key on the external keyboard immediately after pressing the power button. If you have an M-series Mac, you don't actually need a keyboard to enter Share Disk Mode. You simply hold the power button to reach startup options and navigate the menus using an external mouse or trackpad.
Can I move my SSD from a broken MacBook Pro to a new one?
Physical SSD swaps are only possible on MacBook Pro models from 2015 or earlier. On all newer machines, the storage chips are a permanent, soldered part of the logic board. You cannot unscrew the drive and move it to a different computer. Instead, the original logic board must be repaired or accessed through specialized technician tools to move your files to a new machine.
How long does professional data migration usually take?
Professional diagnostics often happen in about one hour at a specialized shop. The actual migration time varies based on your total file size and the health of the drive. While a few gigabytes might move quickly, a full terabyte of data can take several hours to transfer once the hardware is stabilized. Most professional services aim for a 24 to 48-hour turnaround for the entire process.
What happens if my broken Mac is encrypted with FileVault?
FileVault encryption doesn't block recovery, but it does require your admin password or recovery key. When you connect a broken Mac to a new one using Target Disk Mode or Share Disk Mode, the system will recognize the encrypted volume. You'll be prompted to enter your original login credentials on the new Mac before the files become visible and ready for transfer.
Is it possible to recover data after a liquid spill on a MacBook?
Liquid spills are often recoverable if you act quickly and stop trying to power on the machine. Professional ultrasonic cleaning removes the corrosive residue that bridges power lines on the logic board. Once the board is cleaned and any damaged components are replaced, the system can usually be brought back to life long enough to perform a full and secure data dump.


Comments